Quick Install Tip From the Desk of Andria
There is nothing quite like finishing up a new pool project complete with a water slide installation, and stepping back to enjoy the finished product with your client. No matter if the installation is centered around dirt berms and landscaping, or included in your client’s waterfall or grotto, the impact is the same. When you step back and look at the finished work you and your team have put into the project and you see their new gorgeous water slide…….with a brand new puddle of water at the end that will not drain.

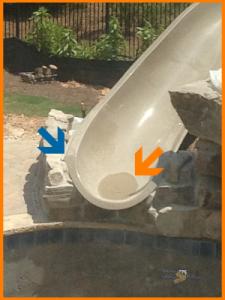
Incorrect Installs Can Leave Ugly Water Puddles Behind
This puddle of water may not seem like a big deal to some, but the water sitting in the flume overtime will deteriorate the gel coat in that area at a much faster rate, so it should be avoided at all costs. Who wants a big circle of yuck sitting at the end of their water slide? Count us out. Count your client’s out too, because they will be calling you to come and fix this as some point.
All 15.5′ Dolphin One Piece slides must achieve an elevation change of 5’3″ from the underside of the end of the slide terminus up to the elevation of the underside flange of the entry of the slide. (See Drawings in Install Manual for further clarification.)
Before completely securing the slide into place, always pour a cup of water down the slide to make sure that the water does not pool near the end. (Example shown in photo above). If your slide is holding water near the exit, you will need to adjust your middle support so that the inside curve handrail is 5″-6″ lower than the outside curve handrail where the slide terminates. If the slide placement is so that the inner and outer handrails are vertically even, the slide will not drain water properly.
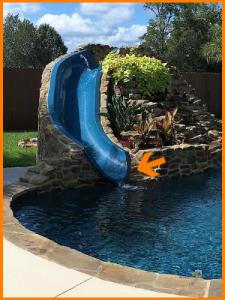
This slide is designed so that the rider will bank slightly off the outside curve.Please see the photo below. Notice how this slide on the ends with the outer edge of the handrail raised higher than the inner edge of the handrail and water flows freely out of the slide.

Correctly Installed Slide will not hold water, and will have outer handrail banked higher than the inside.

